How to make Thief Rikku's Costume
RIKKU'S THIEF'S SKIRT
Needed material:
- Alkantara
- Velcro
- Orange laces
- Eyelets

Procedure
For the skirt I used alkantara cloth, and for the model I did it
watching many illustrations, then I inserted the eyelets and inside to
them a orange leather strings.
To close the skirt, I used a piece of velcro.
RIKKU'S THIEF'S SCARF
Needed material:
- Cloth in Wool (Yellow)
- Cloth Colo for Batik (Red)
- Yellow Wool
Procedure:
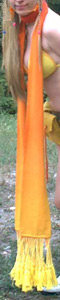 For the scarf, you take wool tissue (yellow color) and
with this you make a scarf ( double layer), now you take batik color
(red) and dye for the center of the scarf ( some immersion are needed).
When you have the right color you stop this procedure.
For the scarf, you take wool tissue (yellow color) and
with this you make a scarf ( double layer), now you take batik color
(red) and dye for the center of the scarf ( some immersion are needed).
When you have the right color you stop this procedure.
Now you take the yellow wool and make the plumes (for each are needed
about 20).
RIKKU'S THIEF'S SHOES
Needed material:
- Pair of Boots in Leather
- Acrylic Color Spray
- White Silk Ribbon
-Yellow shoeslaces
- Eyelets

Procedure
For the shoes I used a pair of boots in leather, I cut the upper part
vertically to triangle.
Then I glued another piece of leather under the triangle, so the
triangle stay open.
Then I took some acrylic color (blue and white) and I painted the
boots, to avoid that the colors mixed I used paper tape to divide the
parts.
First you give the blue and then the white.
Now you put the eyelets on the back of the
boots, and then you put in the
eyelet the yellow shoelaces.
Now you take some silk white ribbon and with glue you make the
decoration on the border of the boots.
This is the method that I made my shoes.
RIKKU'S THIEF'S PANTIES
Needed material:
- Yellow Lycra
- Orange Lycra or other Flexible Cloth
Procedure:
I think that the more right procedure for this is to take a panties
similar to a tanga and to copy the model.
When you have copied the model in a paper, you bring it on the cloth,
you use the same cloth that you used for the bra.
I advice that is better to use the yellow lycra.
When you have cut and sew it, take two strips of orange lycra or other
flexible cloth, is better to use the same orange lycra of the bra or to
find a similar color cloth.
Sew this two strips at the border of the tanga, if you make them in
flexible cloth, they will stay on, in your hips without problems.
Remember that the orange strips are really important in this
pieces of the costume, because you will see only them over the skirt.
This is the correct method, but if you have haste you also can sew the
strips over the skirt...but the result is not so wonderful
.
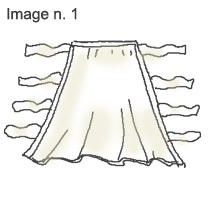
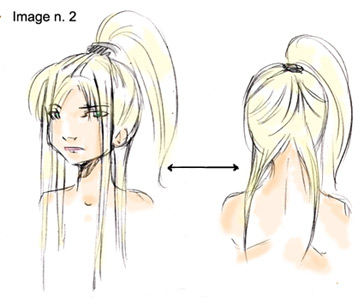
RIKKU'S THIEF'S SLEEVES
Needed material:
- White or Cream color Cloth, Semitransparent (Remember don't use
of the Cyfone)

Procedure:
See the model of the Sleeve in a official Rikku's image, cut it
on the paper and bring it on the cloth (remember to do this with open
model and not already close^^;;;)
Now sew the hem of the sleeve, but leave open it, you will close
it with the ribbon.
Cut always in the cloth eight strips, these will became the strips for
the ribbons.
Now sew them in the border of the sleeve, in
specular mode as you see in image n. 1.
For more security is better that you close the top side of
the sleeve and insert in it a elastic
strip, so the sleeve will rest on your arm without problem.
The Sleeves are ready, you must only tie the strip and to do the
ribbons.
(If you have some friend you wear the sleeves and ask at your friend to
tie the ribbons, while if you are alone, tie the ribbons before to wear
the sleeves-
RIKKU'S THIEF'S BAGS
Needed material:
- Yellow Strong Cotton Cloth, Yellow Leather or Faux Leather
- Buckle
- Orange laces
- Large Eyelets
-
Press Stud
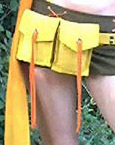
Procedure:
Cut the shapes similar to that you see in the image n.1 on
the cloth and sew it.
You must make a little bag, so you take the right sizes on you
body.

Now cut in the cloth also a little loop, where then
you will insert the belt.
Remember to sew it not in the center of the bag, but more in height
size, anyway you can see it in image n.2
.
Now put the eyelets on the opening and then over this sew the orange
laces then in second moment you will insert in the eyelets's hole, so
the bag will rest close.
For the belt you make it always in same cloth of the bag, remember to
sew it in doulble layer, so it will be more resistent.
Now insert in it the press stud (you can insert it like closing or like
decoration, check it in official Rikku's image).
Then when the belt will be ready, put in it also the buckle, I know
that
this type of buckle is dirricult to find, so you can costumize it.
Take a similar buckle without steel bar in the middle and
make it with a steel lamination or in other metals, that you can
find in hardware store and attach it with strong glue (loctite) or fuse
it with oxyhydrogen flame.
The last thing, to do stay the bags more swollen, you can insert inside
them a piece of foam rubber.
RIKKU'S THIEF'S GLOVES
Needed material:
- A pair of gloves in leather color bordeaux or dark brown
in alternative leather in these color.
Procedure:
My advice is to buy a pair of gloves in leather color bordeaux (is
better) or dark brown, then to cut the finger in the middle.
Now with a cotton thread of the right color sew and stop the
stitchs cut, so the gloves won't break.
In alternative if you don't find a gloves you can do them with leather,
you take the model of another pairs of gloves.
I advice you to don't use the faux leather, because will make sweat the
hands, and is more likely that it break with the hot.
RIKKU'S THIEF'S HAIR'S BAND
Needed material:
- A White Hair Band or Flexible Cloth.
- Blue Color for Batik
Procedure:
You can take a large hair band color with or make it with flexible
cloth (remember don't use the lycra, because it don't absorb the batik
color, is better a flexible cotton).
Making a hair band is really simple, cut a long strip the two ways the
right size.
Now fold it in two, and sew it in the border, to leave a border
open.
Now turn over it and close also the last open border (remember to close
it with the border inside, like the other bordres).
Then sew the two extremities together.
Now whe you have the hair band ready, prepare the color for batik
and dye it with many baths to create a soften.
RIKKU'S THIEF'S EARRINGS
Needed material:
- Two Yellow Feathers
- Orange Acrylic Color for Airbrush
- An Airbrush
- Hooks for Hearings
Procedure:
If you find already a pair of earring with yellow feather is better,
but you can also to costumize them.
Anyway you can take the feather or the earrings with feathers, and with
a airbrush with orange color soften it.
If you have alread the earrings, you finished them...but if you have
only the feather now make this.
Put the hooks (remember to buy only piece don't only the hook but also
the join for it) at the feather, and them are ready.
(remember to don't buy only the hook but also the join for it)
About the hooks to buy a long hooks, because the earrings of Rikku are
with a long hook. (Check in official Rikku's image)
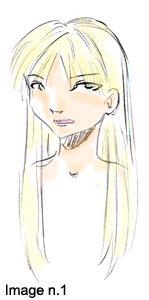
RIKKU'S THIEF'S BRA
Needed material:
- Yellow lycra
- Orange lycra or silk strip
- Orange laces
- Eyelets
- Bra's cups
- Black leather belts
- Two buckles

Procedure
Take two bra's cup with triangle shape.
Cover them with yellow lycra (as you see in the first image)

Now take a strip of orange lycra or silk and sew it around the
bra's cup covered with yellow lycra. (see the image)

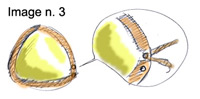
Put two eyelets on every bra's cup over the attached orange strip; here
you will put the orange laces, when you will link the two cups. (image
n. 3)
Now sew a little yellow lycra strip at the two cups ( remember to do
this in lycra, because it must be flexible, so also without
fasteningr you can wear the bra, without break it or open it with
orange laces.
Then sew a short black leather belt with a buckles at the hight side of
the cup. (image n. 4)

when you finished this, put in the buckles a long black leather belt,
that will go from a cup to other cup. (you see this in the image).
So you finished all the Rikku's Bra.
Note: You can do it also without bra cups but I advice for the persons
with big breast is better to use the cups.
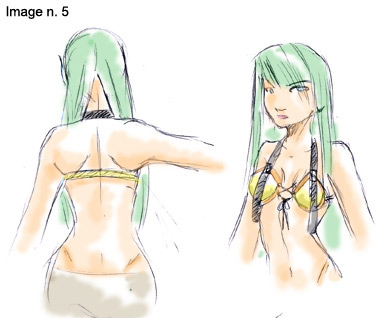
RIKKU'S THIEF'S WIG
Needed material
:
- Long Blonde Wig
- Blue and Pink beads of various dimensions.
- Trasparent Rubber Bands for hair
- Black Rubber Bands for hair

Procedure:
Take a normal blonde wig for carnival, Halloween or other
event in costume of your country. (Image n. 1)
Don't worry if your wig isn't a perfect, without longer hair or right
fringe, in this tutorial I'll teach you how adjust it.
Tie the hair's wig in ponytail with a black rubber band, but leave two
hair locks in front and behind, as you see in image n. 2.
Now do four little pigtails at these locks and tie them with trasparent
rubber band and put in them the beads (image n. 3)
Here you must use two types of beads, two big (blue and pink) and
two really small. (for the right color check on the official Rikku's
image).

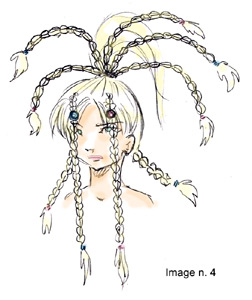
Take in the pony tail some locks, and do also at these little pigtails
and close them always with trasparent rubber band as in the image n. 4
(check the number of pigtalis onofficial Rikkus' image)
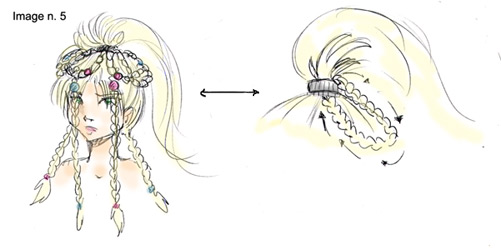
Now insert a medium beads in the middle of the pigtails,
then insert the bottom side of the pigtails in the black rubber band,
as you see in the image n. 5,
while you insert the pigtails you must cross they between them.
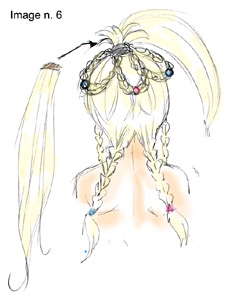
Now if you see that your ponytail isn't long enough, buy a hair blonde
extension (you can do it also with another wig, cut the hair and sew it
on the cloth strip) and insert this appilication inside at the
black rubber band, so you will have a longer ponytail. (see the image
n. 6)
If the fringe is too short, take or make an extension and sew it at the
wig with a normal needle (you must sew it by hand, because with
sewing machine it's impossible to do and the result won't be good).
Image n. 7
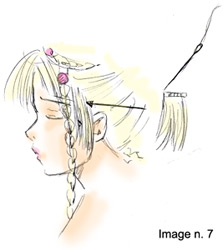
Now put the wig on you head, and insert the hair band, and put on
it the two free pigtails on it, as you see in the image n. 8
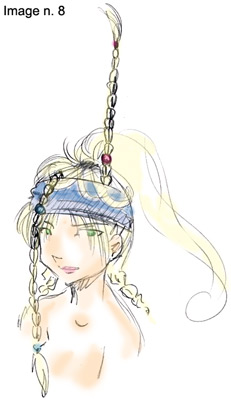
So your wig will be ready.^^
by Hoshi